Apache Hadoop is an open source framework used for distributed storage and distributed processing of big data on clusters of computers/ commodity hardwares. Hadoop stores data in Hadoop Distributed File System (HDFS), the processing of these data is done using MapReduce.
The Apache Hadoop framework is composed of the following modules:
- Hadoop Common
- Hadoop Distributed File System (HDFS)
- Hadoop YARN
- Hadoop MapReduce
Hadoop Common contains the libraries and utilities required by other Hadoop modules.
HDFS a distributed file-system that stores data on commodity machines, providing very high aggregate bandwidth across the cluster.
Hadoop YARN is a resource-management platform responsible for managing computing resources in clusters and using them for scheduling of users’ applications.
Hadoop MapReduce is an implementation of the MapReduce programming model for large scale data processing.
Hadoop ecosystem consists of the above base modules along with some additional packages which are installed on top of the Hadoop like Apache Hive, Apache Pig, Apache HBase, Apache Spark, Apache Flume, Apache Oozie, Apache Sqoop, Apache ZooKeeper, Cloudera Impala, Apache Storm and Apache Phoenix.
Hadoop can be run in any of the following three modes: Standalone Mode, Single-Node Cluster (Pseudo-Distributed) and Multiple- Node Cluster (Fully Distributed) mode.
There are some prerequisites to be installed before installing Hadoop in Single-Node Cluster (Pseudo-Distributed) mode. They are,
Step 1) Installing JAVA
You can choose Default jdk or Oracle jdk according to your preference.
Step 2) Install MySQL (optional)
Step 3) Add a dedicated Hadoop User
Step 4) Install and configure SSH for Hadoop
Note: You can check out my previous posts for the above steps.
Now you are all set to go for installing Hadoop.
Install Hadoop
su hduser
Download the Hadoop 2.6.0 version from the mirror downloads
sudo wget http://mirrors.sonic.net/apache/hadoop/common/hadoop-2.6.0/hadoop-2.6.0.tar.gz
sudo tar xvzf hadoop-2.6.0.tar.gz

Create a directory Hadoop
sudo mkdir /usr/local/hadoop
Move the Hadoop installation to the newly created directory /usr/local/hadoop
sudo mv hadoop-2.6.0 /usr/local/hadoop

The chown command is used to changes the owner and owning group of files.
sudo chown -R hduser:hadoop /usr/local/hadoop
Setup Configuration Files
The following files will have to be modified to complete the Hadoop setup:
~/.bashrc
/usr/local/hadoop/etc/hadoop/hadoop-env.sh
/usr/local/hadoop/etc/hadoop/core-site.xml
/usr/local/hadoop/etc/hadoop/mapred-site.xml.template
/usr/local/hadoop/etc/hadoop/hdfs-site.xml
Before editing the ~/.bashrc , we need to find the path where Java has been installed.
sudo update-alternatives –config java
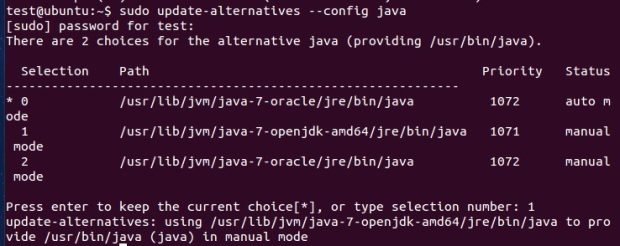
Note: We can set the correct version of Java by choosing from the available alternatives. The path will be used while editing .bashrc file.
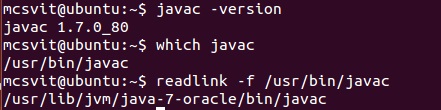
javac -version
which javac
readlink -f /usr/bin/javac
- ~/.bashrc:
The .bashrc file will be in our home directory,
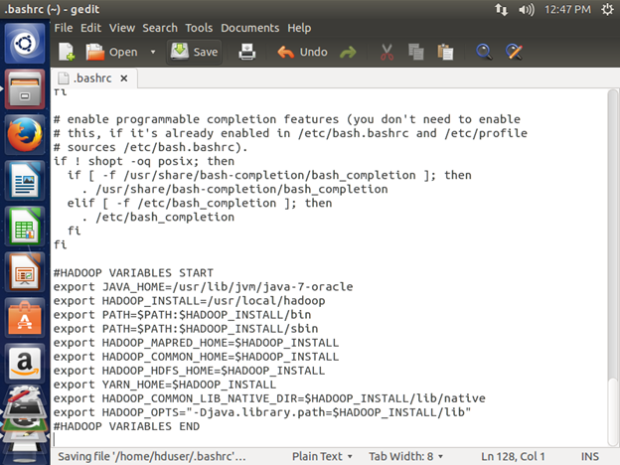
sudo gedit ~/.bashrc
Now we can append the following to the end of ~/.bashrc:
#HADOOP VARIABLES START
export JAVA_HOME=/usr/lib/jvm/java-7-oracle
export HADOOP_INSTALL=/usr/local/hadoop/hadoop-2.6.0
export PATH=$PATH:$HADOOP_INSTALL/bin
export PATH=$PATH:$HADOOP_INSTALL/sbin
export HADOOP_MAPRED_HOME=$HADOOP_INSTALL
export HADOOP_COMMON_HOME=$HADOOP_INSTALL
export HADOOP_HDFS_HOME=$HADOOP_INSTALL
export YARN_HOME=$HADOOP_INSTALL
export HADOOP_COMMON_LIB_NATIVE_DIR=$HADOOP_INSTALL/usr/local/hadoop/hadoop-2.6.0/lib/native
export HADOOP_OPTS=”-Djava.library.path=$HADOOP_INSTALL/usr/local/hadoop/hadoop-2.6.0/lib”
#HADOOP VARIABLES END
To save the changes execute the following
source ~/.bashrc
Note: We can edit the ‘JAVA_HOME= ‘according to the java version installed. For demo, I have used Oracle JDK 7. For example, if you are using the default JDK, you can use ‘/usr/lib/jvm/java-7-openjdk-amd64’ instead.
- /usr/local/hadoop/hadoop-2.6.0/etc/hadoop/hadoop-env.sh
We need to set JAVA_HOME by modifying hadoop-env.sh file to ensure that the value of JAVA_HOME variable will be available to Hadoop.
sudo gedit /usr/local/hadoop/hadoop-2.6.0/etc/hadoop/hadoop-env.sh
export JAVA_HOME=/usr/lib/jvm/java-7-oracle
export JAVA_LIBRARY_PATH=${JAVA_LIBRARY_PATH}:${HADOOP_HOME} /usr/local/hadoop/hadoop-2.6.0/lib/native/
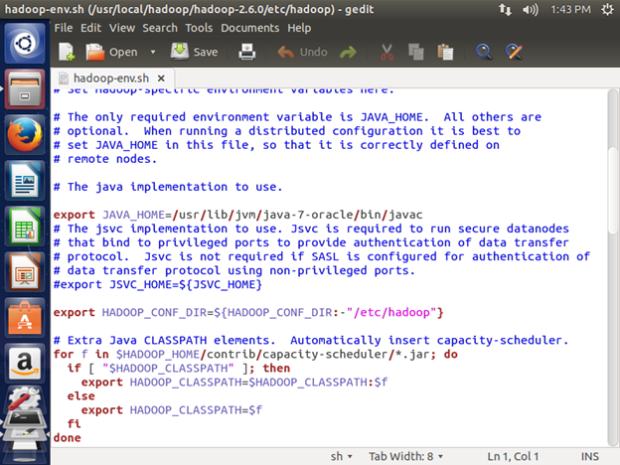
Note: The ‘JAVA_HOME=’ value should be same as in .bashrc file.
Note: You may encounter with the error, “WARN util.NativeCodeLoader: Unable to load native-hadoop library for your platform… using builtin-java classes where applicable” if you don’t enter the second line as given above in hadoop-env.sh file.
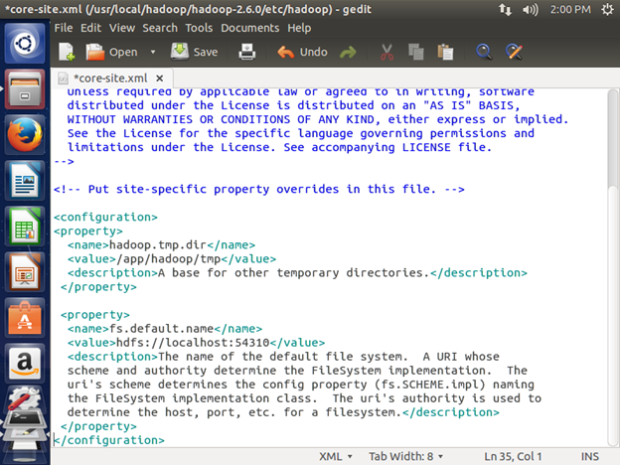
- /usr/local/hadoop/hadoop-2.6.0/etc/hadoop/core-site.xml
This file contains configuration properties that Hadoop uses when starting up.
Open this file,
sudo gedit /usr/local/hadoop/hadoop-2.6.0/etc/hadoop/core-site.xml
Enter the following content in between the <configuration></configuration> tag:
<property>
<name>hadoop.tmp.dir</name>
<value>/app/hadoop/tmp</value>
<description>A base for other temporary directories.</description>
</property>
<property>
<name>fs.default.name</name>
<value>hdfs://localhost:54310</value>
<description>The name of the default file system. A URI whose
scheme and authority determine the FileSystem implementation. The
uri’s scheme determines the config property (fs.SCHEME.impl) naming
the FileSystem implementation class. The uri’s authority is used to
determine the host, port, etc. for a filesystem.</description>
</property>
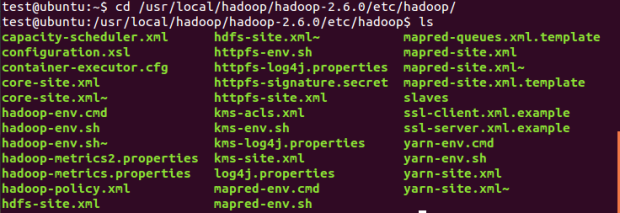
- /usr/local/hadoop/hadoop-2.6.0/etc/hadoop/mapred-site.xml
This file is used to specify which framework is being used for MapReduce. By default, the folder /usr/local/hadoop/hadoop-2.6.0/etc/hadoop/ contains the file named mapred-site.xml.template which has to be duplicated and named as mapred-site.xml
To duplicate the file,
sudo cp /usr/local/hadoop/hadoop-2.6.0/etc/hadoop/mapred-site.xml.template /usr/local/hadoop/hadoop-2.6.0/etc/hadoop/mapred-site.xml
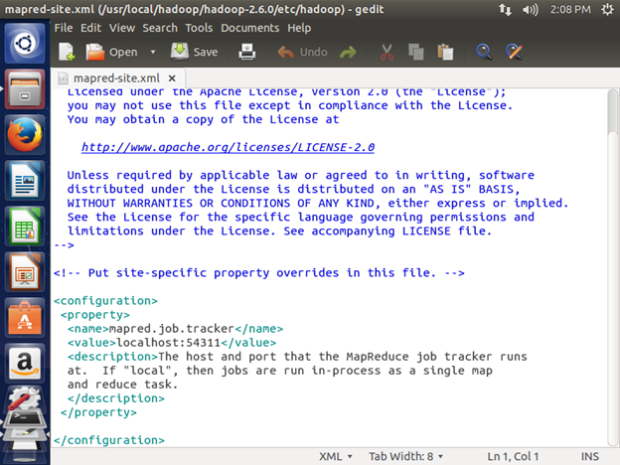
sudo gedit /usr/local/hadoop/hadoop-2.6.0/etc/hadoop/mapred-site.xml
We need to enter the following content in mapred-site.xml file in between the <configuration></configuration> tag:
<property>
<name>mapred.job.tracker</name>
<value>localhost:54311</value>
<description>The host and port that the MapReduce job tracker runs at If “local”, then jobs are run in-process as a single map and reduce task.
</description>
</property>
- /usr/local/hadoop/etc/hadoop/hdfs-site.xml
hdfs-site.xml is used to specify the directories which will be used as the namenode and the datanode on that host. This file needs to be configured for each host in the cluster that is being used.
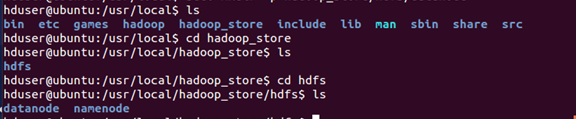
Two directories must be created which will contain the namenode and the datanode for this Hadoop installation
sudo mkdir -p /usr/local/hadoop_store/hdfs/namenode
sudo mkdir -p /usr/local/hadoop_store/hdfs/datanode
Note: You can create these directories in different locations, but make sure to modify the contents of hdfs-site.xml accordingly.
Once this step is done, open the /usr/local/hadoop/etc/hadoop/hdfs-site.xml file with gedit using the following command:
sudo gedit /usr/local/hadoop/hadoop-2.6.0/etc/hadoop/hdfs-site.xml
Enter the following content in between the <configuration></configuration> tag:
<property>
<name>dfs.replication</name>
<value>1</value>
<description>Default block replication.
The actual number of replications can be specified when the file is created.
The default is used if replication is not specified in create time.
</description>
</property>
<property>
<name>dfs.namenode.name.dir</name>
<value>file:/usr/local/hadoop_store/hdfs/namenode</value>
</property>
<property>
<name>dfs.datanode.data.dir</name>
<value>file:/usr/local/hadoop_store/hdfs/datanode</value>
</property>

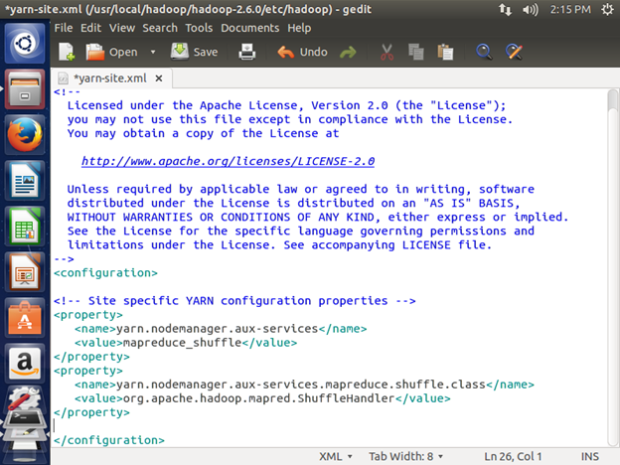
6) /usr/local/hadoop/etc/hadoop/yarn-site.xml
sudo gedit /usr/local/Hadoop/etc/hadoop/yarn-site.xml
Add the following to the configuration Tag
<property>
<name>yarn.nodemanager.aux-services</name>
<value>mapreduce_shuffle</value>
</property>
<property>
<name>yarn.nodemanager.aux-services.mapreduce.shuffle.class</name>
<value>org.apache.hadoop.mapred.ShuffleHandler</value>
</property>
Change Folder Permission
sudo chown hduser:hadoop -R /usr/local/hadoop
sudo chown hduser:hadoop -R /usr/local/hadoop_store
sudo chmod -R 777 /usr/local/hadoop
sudo chmod -R 777 /usr/local/hadoop_store
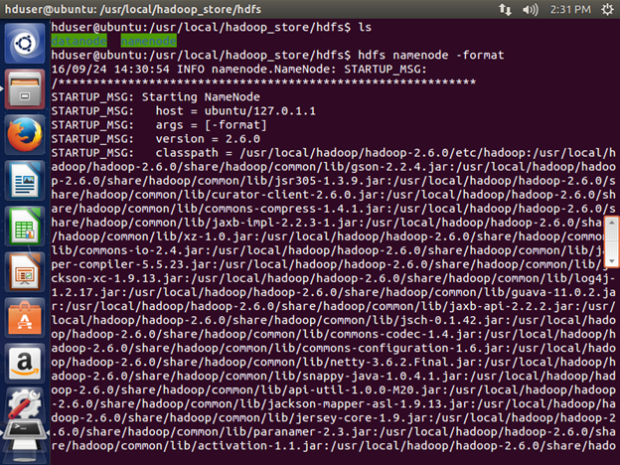
Format the New Hadoop Filesystem
Now, the Hadoop file system needs to be formatted so that we can start to use it.
hdfs namenode -format
Note: This only needs to be done once before you start using Hadoop. If this command is executed again after Hadoop has been used, it’ll destroy all the data on the Hadoop file system.

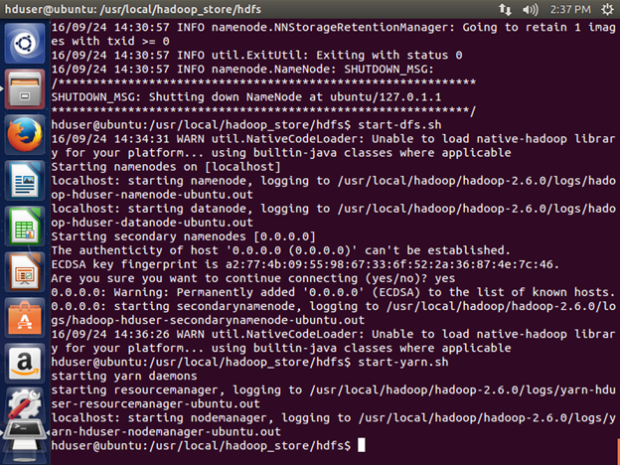
Starting Hadoop
Now it’s time to start the newly installed single node cluster.
start-dfs.sh
start-yarn.sh
(or)
start-all.sh
Check if Hadoop is running:
cd /usr/local/hadoop/hadoop-2.6.0/sbin
then type jps

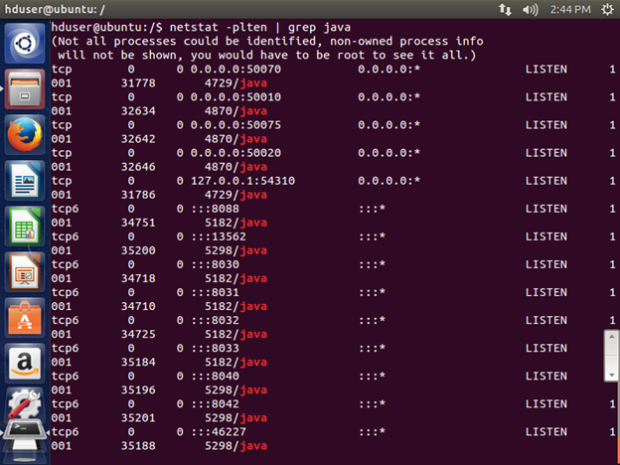
You can also make use of the netstat command:
netstat -plten | grep java
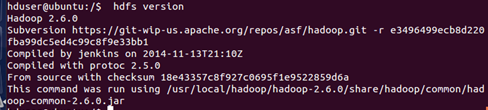
Check hdfs version:
hdfs version
Stopping Hadoop
stop-dfs.sh
stop-yarn.sh
(or)
stop-all.sh
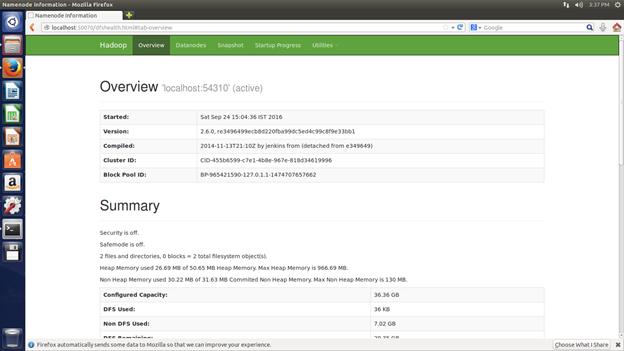
Using the Web UI
You can use the Hadoop web UI by typing the URL in the browser,
That’s it. You can start using Hadoop and explore more.

thank you for share this best tutorial
just i have problem in this command “sudo hdfs namenode -format”
error show me this “No command ‘hdfs’ found, did you mean:
Command ‘hdfls’ from package ‘hdf4-tools’ (universe)
Command ‘hfs’ from package ‘hfsutils-tcltk’ (universe)
hdfs: command not found”
I follow all this step
and thank you advance
LikeLike
It is ‘hdfs namenode -format’ you can clarify it in https://hadoop.apache.org/docs/r2.6.0/hadoop-project-dist/hadoop-hdfs/HDFSCommands.html#namenode
P.S: If you have copy-pasted the command, try typing it once. The hyphen(-) may cause issues sometimes.
LikeLike
the same error that cant found the command hdfs
LikeLike
First check if hadoop is running, use jps command.
If its running, then try the format command from the directory in which namenode is created? I mean ‘/usr/local/hadoop_store/hdfs’
Also try ‘hadoop’ instead of ‘hdfs’
LikeLike
when i run the JPS command it show me this “4902 Jps”
i follow all the step again but i can’t reach to fix it
LikeLike
have you installed hadoop as hduser? or root user? in case of root user then use sudo privileges. try to start hadoop using start-all.sh and try jps. Once its working try to format namenode.
LikeLike
When I run the configuration file env.sh it gives error like failed to register and file can’t open
LikeLike